
Teaching JUMPS & Drops with Confidence: The Triangle of Success
Coaching mountain bike drops is about far more than “just sending it.” Whether you're working with a rider attempting their first 2-foot drop or supporting progression into advanced features, the coach’s job is to assess readiness and guide each step with purpose.
At GSMBC, one of the most valuable frameworks we use is the Triangle of Success — a simple yet powerful way to assess if a rider is ready to take on a new feature.

Three factors are critical for a coach to help a student to determine if they are ready to try something new or challenging.
The Triangle of Success: A Coach’s Decision-Making Tool
Before asking a student to attempt any new or challenging feature — especially something with real consequences like a drop — we ask: Is the student ready?
The Triangle of Success includes three equally important factors:
Technique – Do they have the skills?
Speed (Tactics) – Are they approaching at the right pace?
Mind (Psychological Readiness) – Are they mentally prepared?
Let’s break down each component — and explore how to coach it.
1. TECHNIQUE: Has the student done the homework?
A student who’s practiced good form on smaller features is more likely to succeed when things get bigger. As a coach, assess whether they can consistently demonstrate:
STABILITY & BALANCE: The rider can adjust their riding position and movements to maintain stability (mostly centred) and balance through the approach, ramp, airtime and landing.
PRESSURE: Riders learn to work with the forces generated by the jump to actively control the bike’s trajectory in the air, maintaining stability and direction rather than being passively affected by the terrain.
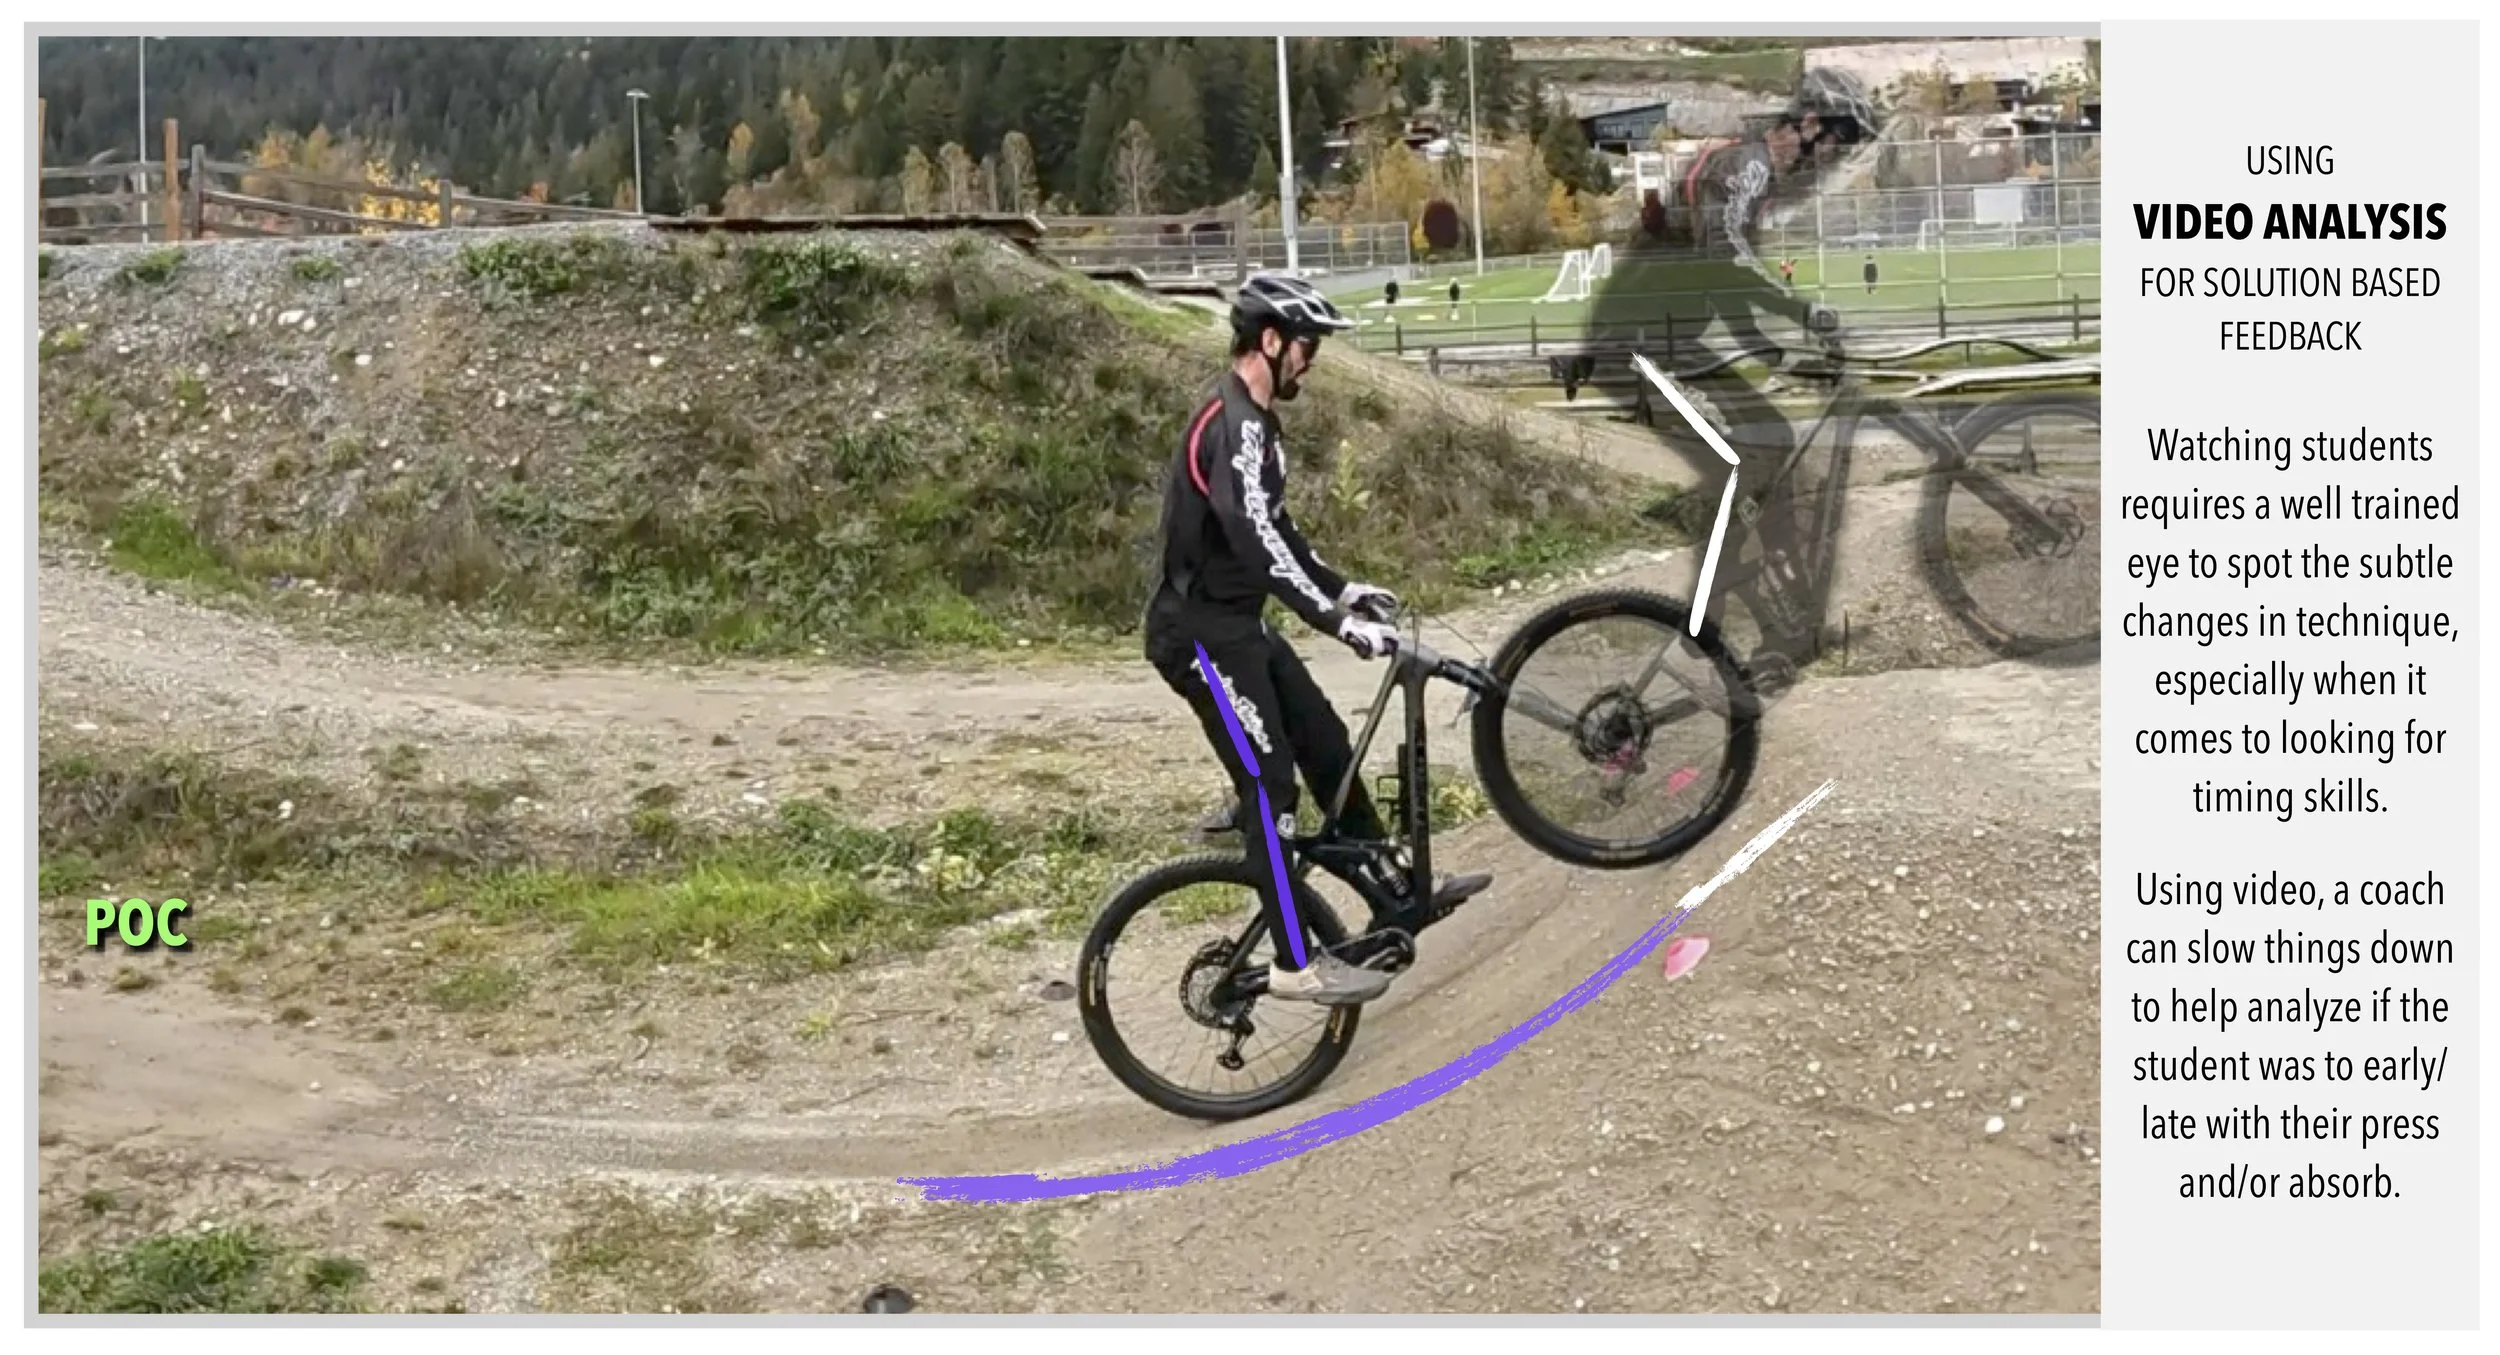
TIMING: Riders have a good sense of timing in terms of when (early, late, near, far) and how much (hard, soft, sudden, gradual) to ‘PRESS’ (see purple lines below) and ‘ABSORB’ (see white lines below) - and how speed impacts these elements.
PREREQUISITES: Riders can demonstrate the 3C’s: consistent, confident, correct technique on similar (or slightly smaller) features, before progressing to the next.
If not, the next step isn’t “go bigger”—it’s repetition with reflection, and refinement. Encourage patience here. Technical preparation builds the foundation for safe progress.
2. SPEED: A simple tactic that’s often overlooked
Speed can determine a whole host of different outcomes, like how the bike behaves off the lip and how a rider connects with the landing. Too little speed often leads to forced (over-exagerated) technique that causes poor timing and flow. Too much can result in poor timing, resulting in reduced precision and therefore stability into the air.
Coaching tactics:
Point of Commitment (POC) & Run-ins: Let students practice the entry line, POC and speed without committing to the feature. This is why table top jumps are essential for lessons so they can gradually feel the size, shape and speed required, without having to jump to the landing first go!
Demonstration: Seeing a coach ride the line at appropriate speed builds trust and understanding. Never underestimate the value of simply demonstrating the ideal approach speed along with the timing and ‘intensity’ of the PRESS & ABSORB.
Visual cues: Use flags, cones or markers to give students reference points for where to start, when to stop pedalling and even for the point of commitment and where to start pressing the bike.
Even if a student has solid technique and confidence, the wrong speed can derail their success. This is often the most fixable (and under-coached) element. Coaches can easily fall into the trap of giving their riders lots of technical feedback when all that was needed was a slight adjustment in speed.
3. MIND: Are they MENTALLY ready?
Mental readiness might be the most crucial — and least visible — part of the triangle.
What to look for:
Positive indicators: Focused breathing, visualizing success, self-initiated attempts
Warning signs: Hesitation, negative self-talk, excessive “what if” questions, overly cautious braking on the run-in
Sometimes, even with the right skills and speed, the mind says, “Not today.” That’s okay. Coaches should allow space for riders to back off without shame. Confidence grows with time and positive experience. Rushing a rider who is technically ready but not mentally so, rarely results in a positive outcome.

Jumping is also fantastic to help riders develop fundamental skills such as Stability & Balance, Pressure and Timing… which can translate to helping them with everything they ride!
Common Triangle Imbalances (And How to Coach Through Them)
1.Technique + Speed, but Low Mental Readiness
What it looks like: Rider hesitates on the run-in, second-guesses, or gets stuck visualizing failure.
Coach approach: Shift focus to mindset. Use visualization, step-back progressions, or have them lead a peer through the feature (teaching builds confidence).
2.Technique + Mind, but Speed Is Off
What it looks like: Rider commits but cases the drop or overshoots. Technique appears fine, but timing feels off.
Coach approach: Break down the tactic. Show them a video of their riding. Add visual markers, adjust run-in terrain, or ride the line for reference. Reinforce how appropriate speed makes technique easier.
3. Speed + Mind, but Technique Isn’t There
What it looks like: Confident and enthusiastic rider tries the feature but lacks control — body position, pressure control or timing is off, or landing is rough.
Coach approach: Step back. Use smaller features to refine movement. Slow the progression to ensure long-term success and reduce injury risk. Focus on consistent, quality movements without getting air. 95% of jumping can be learned through pumping the bottom of a ramp and absorbing the lip… all while keep the tires on or close to the ground!
Applying This in Coaching Practice
At GSMBC, we train coaches to assess the Triangle of Success on every new feature or progression. For example, in the Intro to AIR course, we focus on coaching small drops between 1–3 feet. Coaches learn to:
Break features down into smaller, learnable pieces
Diagnose areas of improvement in the triangle and focus on positive solutions
Give feedback that supports all three sides of performance
In the Advanced AIR course, the triangle becomes even more important as jumps grow longer and drops get higher. Coaches are taught how to structure progressions for trick features, develop speed drills, and work with riders on confidence and visualization.
Final Thoughts
Jumps and drops can be one of the most intimidating — and rewarding — skills to teach. But success isn’t just about clearing a feature. It’s about knowing why a rider is ready, and supporting them with the right technical cues, tactical tools, and psychological scaffolding.
Use the Triangle of Success every time you teach a new feature, and you’ll create safer, more confident riders — and grow as a coach in the process.
KEEN to Learn More?
If you're looking to improve your own coaching structure for jumps and drops, GSMBC offers two focused courses between the classic Level 1-4 Certifications:
Intro to AIR CERTIFICATION
For Level 1-certified coaches starting to teach airtime basics.
Learn to introduce students to tabletop jumps and drops on small features with control, confidence and success!
More details here: https://www.gsmbc.pro/coachingintrotoair
Advanced AIR CERTIFICATION
For Level 2 or 3-certified coaches ready to guide riders through larger drops, longer gaps, and trick progression.
Refine your technical eye, risk management strategies, and coaching psychology.
More details here: https://www.gsmbc.pro/coachingadvancedair