
Mountain Bike Coaching Q&A: Frame Sizing, Suspension, Setup & More
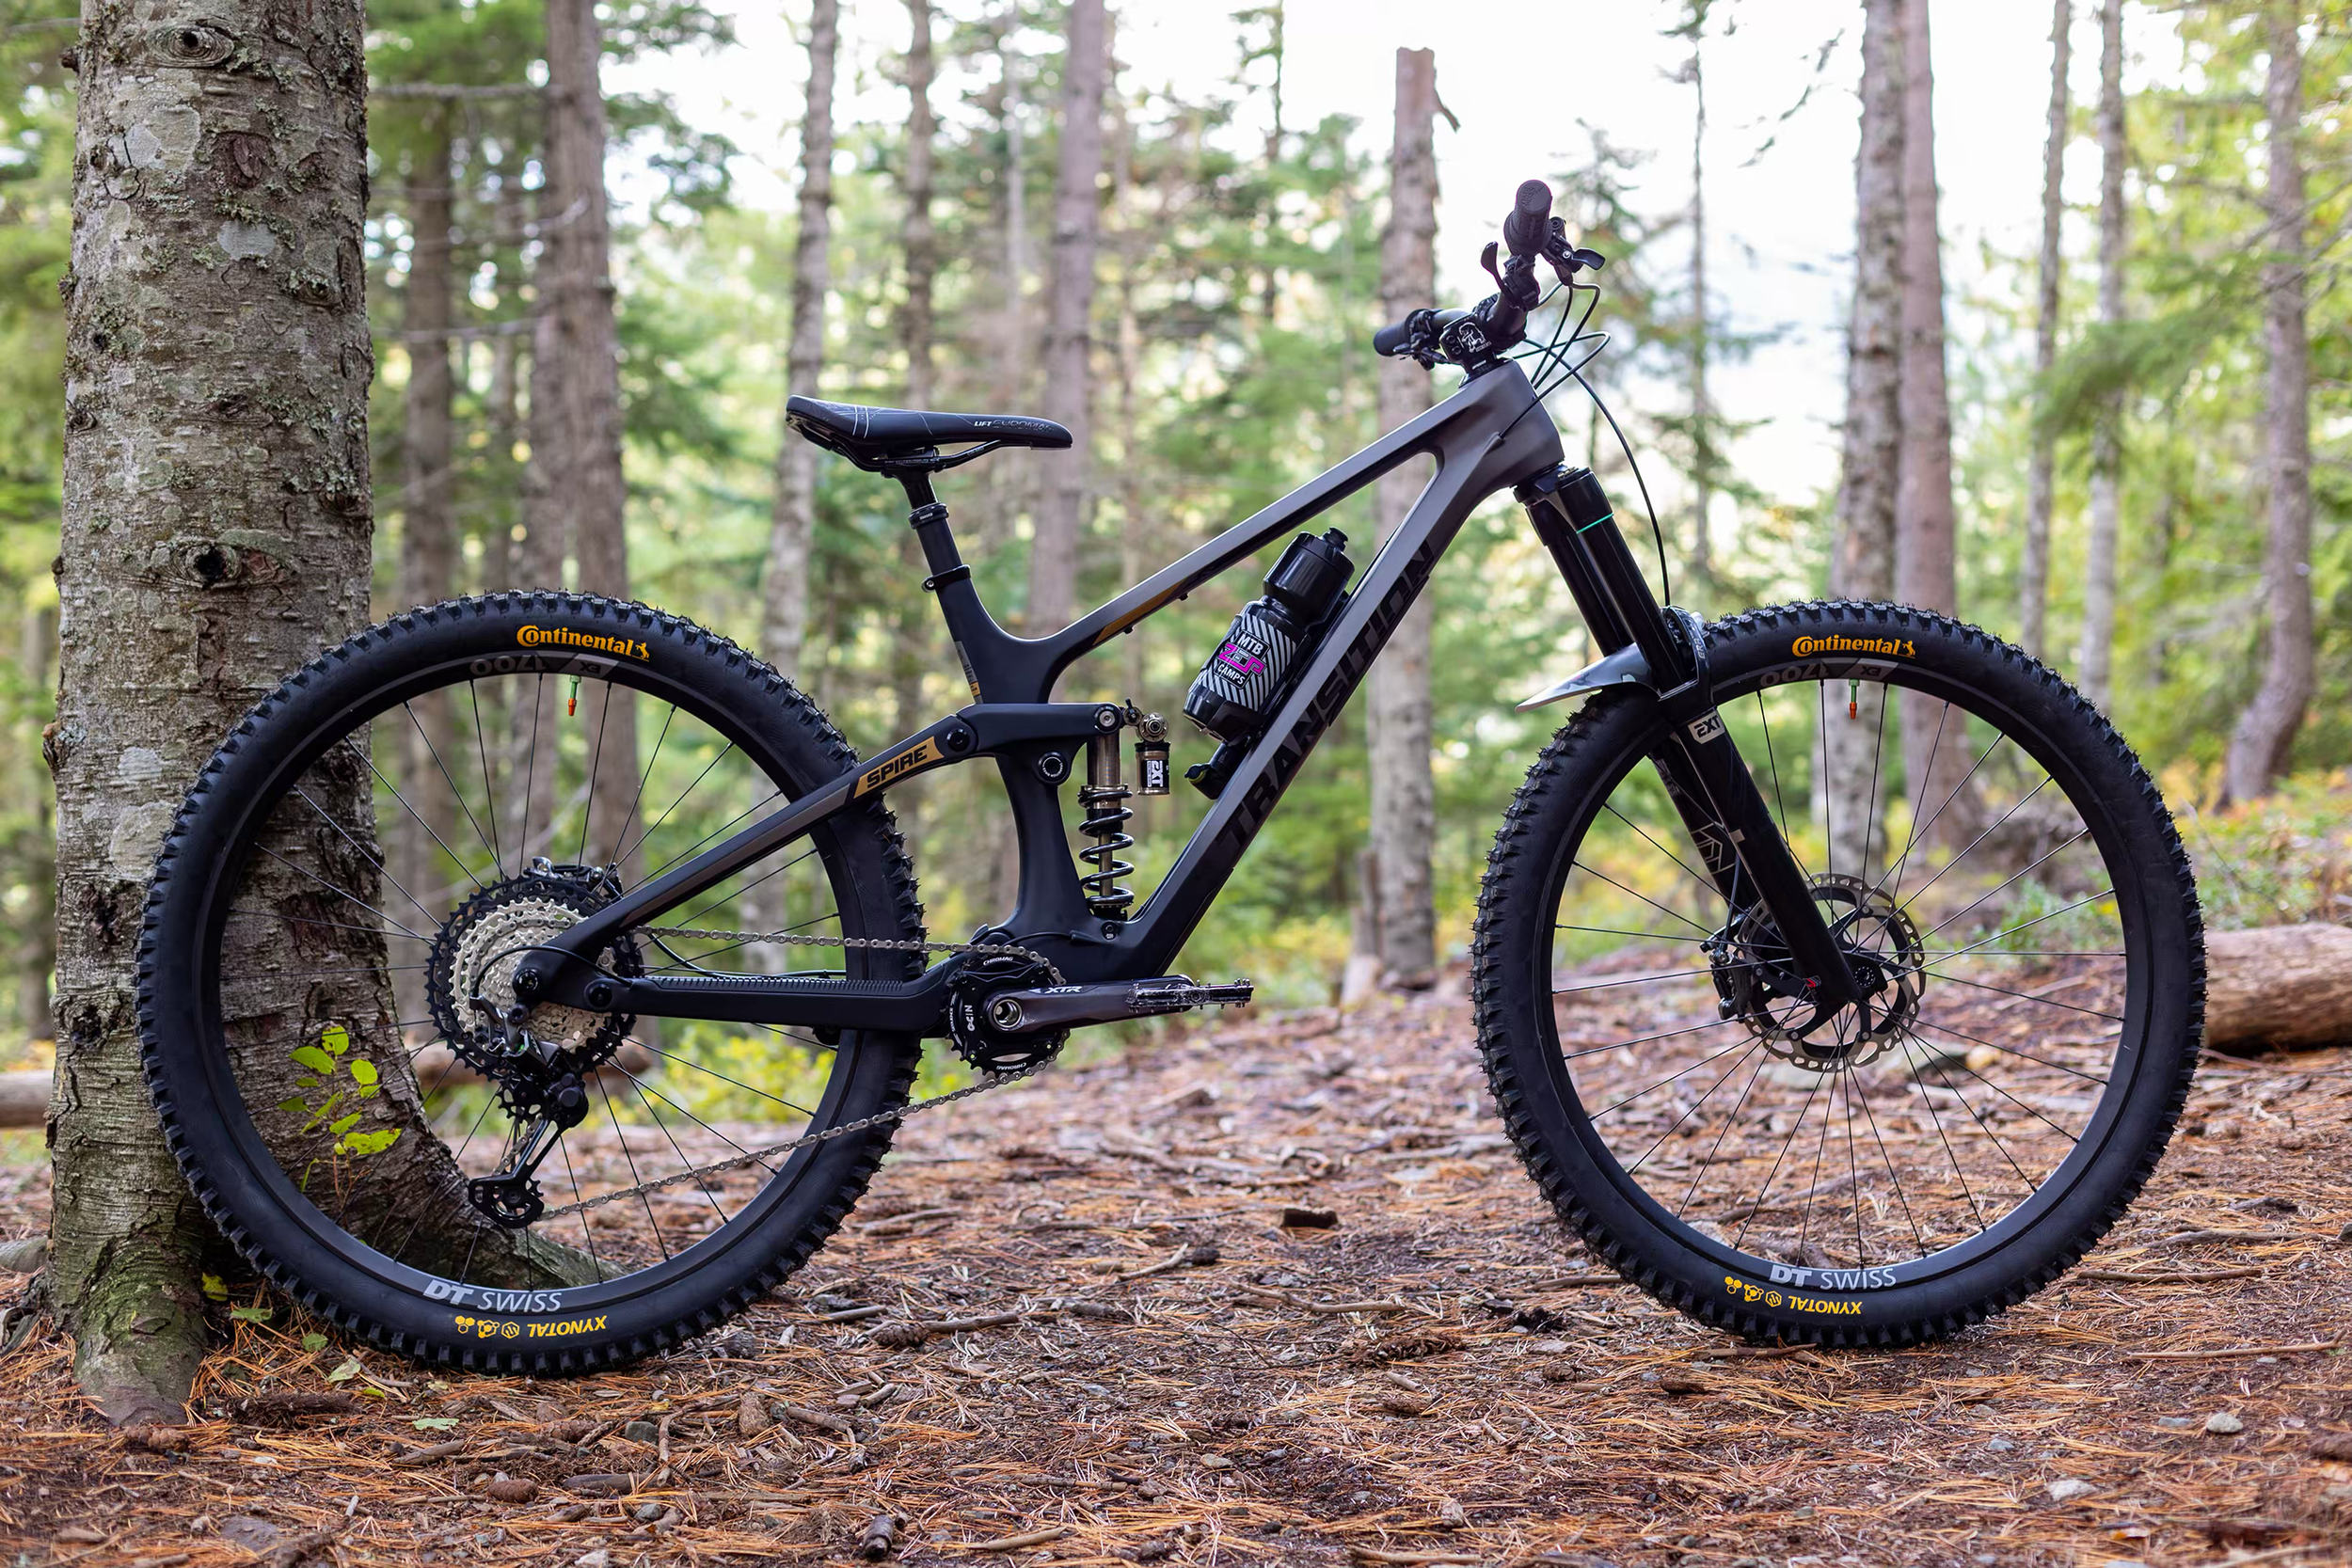
As mountain bike coaches, one of our key roles is to ensure our students’ bikes are properly set up for safety, comfort, and performance. A well-fitted bike gives riders confidence to tackle trails (think of Whistler’s technical singletrack) and reflects GSMBC’s coaching methodology of prioritising safety and progression[1][2]. Below we answer common MTB gear and technique questions - from frame sizing and suspension tuning to handlebar and brake setup - in a friendly Q&A format. Each section is optimised for quick reading, so you can easily scan for the info you need.
Q: How do I measure a mountain bike frame size?
A: Frame size is usually measured along the seat tube. To measure a bike frame, use a tape from the center of the bottom bracket (crank axle) up to the top of the seat tube (where the seat post enters). This length (often given in inches or centimetres) corresponds to the frame size. Most modern mountain bikes use general sizes (Small, Medium, Large, etc.), but those sizes are based on seat tube length (e.g. ~15″ for Small, ~17″ Medium, ~19″ Large)[3].
Pro Tip: Ensure the standover height fits the rider as well. Have your student stand over the bike - they should have at least 2 inches (5 cm) of clearance between the top tube and their crotch for safety and comfort[4][5]. This is especially important when sizing youth bikes or bikes for shorter riders.
Quick Fit Check: Once you have the basic frame measurement, you can fine-tune fit by adjusting components (seat height, stem length, etc.). Remember that two bikes with the same frame size can feel different due to geometry differences (top tube length, reach, etc.). Always do a test ride if possible.
Q: What size mountain bike does my student need for their height?
A: The right bike size is largely based on rider height (and inseam length). Here are general guidelines for frame sizing by height[6][7]:
Riders under ~5’4” (163 cm): Likely XS or S frame. For example, a 5’2” rider would typically use an XS/S. This often corresponds to a frame around 13-15″. Youth around 10 years old (often ~4’6”-5’0”) usually fit 24″ wheeled bikes or XS frames.
Riders ~5’5” to 5’10” (165-178 cm): Medium (M) frame. Mediums are often 17-18″ frames and fit the average adult male or female. If a rider is ~5’10” (178 cm), a M or sometimes L (depending on brand) can work[6].
Riders ~5’11” to 6’2” (180-188 cm): Large (L) frame. Most 6-foot tall riders ride a Large, which usually means a 19-20″ frame[7]. This provides a good balance of reach and stability for taller riders.
Riders taller than 6’2” (189 cm+): XL or XXL frame. For example, a 6’3” rider may need an XL (~21″+ frame). Long legs or arms might push a rider toward the bigger size for more room. Very petite riders (under 5’0”) might need XXS or a 24″ kid’s bike, whereas very tall riders (~6’5”+) could require XXL frames if available.
Keep in mind these are starting points - bike geometry varies by manufacturer, so a 6′ rider might fit a Medium in one brand and a Large in another[8]. When between sizes, consider the rider’s preferences: a larger frame is more stable at speed, while a smaller frame is more nimble[9][10]. Always encourage test rides to see what feels best, and use manufacturer size charts when available. (Many brands publish height ranges for each size.)
Q: How do I choose the right mountain bike wheel size?

A: Mountain bike wheel sizes come in a few standard diameters, and each has its benefits:
26-inch wheels: Older adult mountain bikes and some dirt jumpers use 26″ wheels. They are very agile and strong (shorter spokes). Today, 26″ is commonly found on youth bikes or entry-level bikes. A tween or smaller rider might use a 26″ before moving to larger “adult” wheels[11][12].
27.5-inch (650B) wheels: A popular modern standard, offering a balance of maneuverability and roll-over capability. Great for mid-size riders or those who want a more playful feel. Many trail and enduro bikes use 27.5″, and it can suit riders roughly 5’2″ to 5’10” well (though taller/shorter can ride it too).
29-inch wheels (29er): These large wheels roll over obstacles more easily - perfect for rocky/rooty terrain like many trails in British Columbia. Best for taller riders or those prioritising speed and smoothness. A 29er gives extra confidence on Whistler’s roots and technical sections by smoothing out bumps. The trade-off is a slightly heavier, less flickable feel in tight corners for shorter riders.
For kids under ~4’6″ (137 cm), smaller 24″ or 20″ wheels are appropriate - they allow little riders to handle the bike safely. Always match wheel size to frame size: e.g. an XS frame might come with 27.5″ or 26″ wheels, whereas L/XL frames often come with 29″ wheels. If your student is on the cusp (like a 5’0″ rider could go 26″ or 27.5″), consider their confidence and strength; a slightly smaller wheel might feel easier to control initially.
Bonus: Tire circumference for a 29″ wheel is about 2.3 m (7½ feet) around - useful if you’re setting up a bike computer. And remember, wheel size affects ride feel: bigger wheels = smoother over bumps, smaller wheels = more responsive handling. Choose what helps your student feel most stable on the trails they ride.
Q: How should a mountain bike fit a rider?
A: A properly fitted mountain bike lets the rider feel comfortable and in control. Key fit points to check:
Seat Height: For pedalling, the seat should be high enough that the rider has a slight bend (~80-90% extended) in the knee with the foot at the bottom of the pedal stroke[13]. This maximises leg power. Coaches often use the heel check - have the student place their heel on the pedal; their leg should just straighten out. For descents or technical terrain, a lower seat (or using a dropper post) will lower the centre of gravity for better control[14]. Many riders in BC invest in dropper posts so they can quickly adjust seat height on the fly.
Reach to Handlebars: The rider shouldn’t feel overly stretched out or too cramped. With hands on the bars, there should be a comfortable bend in the elbows. If a rider feels they’re leaning too far or their arms lock out, the bike may be too long; if they feel hunched with elbows very bent, it may be too small. A good rule: when seated, the front hub should be roughly obscured by the handlebar when you look down - this is a ballpark indicator of proper reach. (Modern bike “reach” geometry is an important fit metric[15][16].)
Body Position: While seated, the rider’s torso and arms form roughly a 90° angle at the shoulders. While standing (attack position), they should be centered between wheels. If the fit is right, the rider can easily shift weight forward/back without feeling off-balance.
Handlebar and Controls Alignment: The handlebars should be the right width (more on that below) and angle so the rider’s shoulders are relaxed. Brake levers should be positioned where the student can reach them with index finger without straining (we cover brake setup separately). Also, ensure helmet fit is part of the equation - a helmet should sit level, snug but not tight, with the chinstrap allowing only two fingers of gap under the chin. (Even though not part of the bike, a well-fitted mountain bike helmet is essential for overall comfort and safety on the trail!)
In summary, a good bike fit means stable feet, comfortable seat, neutral hands. The rider should be able to ride for extended periods without pain in the knees, back, or wrists. If something feels off, simple tweaks (seat fore-aft position, stem length, bar height spacers) can fine-tune the fit. Don’t hesitate to make adjustments - even small changes can greatly improve comfort. A properly fit bike = a happier, more confident rider!
Q: How do I set up mountain bike handlebars for the best fit?
A: Setting up the handlebars involves getting the width, height, and angle right for the rider:
Handlebar Width: A general guideline is to match the bar width to the rider’s shoulder width (or slightly wider). Wider bars offer more control on descents (common in modern trail bikes), but if a rider has very narrow shoulders or is a younger student, an overly wide bar can strain their arms. For example, a coach might cut a 780 mm bar down to 720 mm for a smaller 5’2″ rider. Have the rider hold the grips and check their arm position - elbows should naturally angle out slightly, not overly stretched or cramped in.
Rise and Spacers: Bar height (and reach) can be adjusted by flipping the stem or adding/removing spacers under the stem. A higher handlebar (more rise or spacers) brings the bars closer and can be more comfortable for upright riding or for riders with shorter torso/arms. A lower bar puts the rider in a more aggressive forward stance (good for racing or very steep climbs). In British Columbia’s steep terrain (like the North Shore), many riders prefer a bit of extra bar rise to keep their weight back on descents.
Backsweep/Upsweep and Roll: Most handlebars have a slight backsweep (angle toward the rider) - ensure this feels natural on the wrists. You can also rotate the bar within the stem clamp to fine-tune the upsweep angle. Small rotations change how pressure is distributed on the hands. Coaches often adjust bar roll so that the grips are in line with the rider’s hand position when in a push-up stance on the bike.
Controls Position: Mount the brake levers and shifters so they’re easy to reach. Typically, brake levers are angled downward roughly 45° from horizontal, but this can vary. For smaller hands, slide the levers inboard so the index finger hits the lever’s end, and use reach adjust (if available) to position levers closer to the grip.
Encourage your student to give feedback after trying the bike: do the bars feel too wide turning through tight trees? Do they feel pressure on their palms or an odd wrist angle? These clues guide further adjustments. A well-adjusted handlebar lets the rider maneuver confidently, whether threading through a tight forest section or maintaining stability on a Whistler bike park descent. (Alt text suggestion: A GSMBC coach adjusting MTB handlebars for a student, ensuring the width and angle are comfortable.)
Q: How should I set up my mountain bike brakes and levers for better control?

A: Proper brake setup can dramatically improve a rider’s confidence. Key steps:
Brake Lever Position: Angle the brake levers so that when the rider is in a neutral standing position (attack position), their fingers extend in a straight line with their arms to the levers. For most, this means the levers are angled slightly downward (not perfectly horizontal). On steep terrain (common in BC trails), many riders prefer a flatter lever angle (more horizontal) because you’re further back over the bike on descents[17][18]. The goal is to avoid wrist strain - the rider’s first finger joint should rest comfortably on the lever.
Reach Adjustment: Set the lever reach (distance from handlebar to lever) according to hand size. Most hydraulic brakes have a reach adjust dial or screw. For small hands or youth, bring the levers closer to the bar so the student can easily grab them with one finger. The brake bite point (where the brake engages) should occur before the lever hits the handlebars. When properly adjusted, the rider can fully brake without their other fingers getting squished. One of the first things pro riders do on a new bike is dial in the brake reach - if you can’t comfortably reach the levers, braking (and control) will suffer[19].
Lever Clamp Setup: Position the lever clamps such that the levers align with the rider’s index fingers. Also, don’t clamp them ultra-tight - it’s okay if a hard crash can twist the lever on the bar instead of breaking it (a trick is to tighten just enough that levers stay put under use but will move in a crash)[20][21].
Brake Pad Check: For the bike’s stopping power, ensure pads and rotors are clean and not worn out. As a coach, a quick mechanical check is part of setup: pads should have material left and not be glazed; rotors should be true (not rubbing each wheel revolution). If the bike has cable (mechanical) disc brakes, also check cable tension.
By setting the brake levers to fit the rider, you give them more control with less fatigue - no death-grip needed. The rider should be able to one-finger brake comfortably. This frees the other fingers to maintain grip on bumpy trails. In line with GSMBC standards, coaches should be able to adjust brake lever reach and position easily[22] - it’s a quick tweak that can make a big difference in a student’s ability to modulate speed and ride safely.
(Alt text suggestion: Close-up of a coach adjusting a mountain bike’s brake lever reach for a young rider.)
Q: How do I tune a mountain bike’s suspension for my student?
A: Suspension tuning might sound advanced, but a few basic adjustments go a long way:
Set the Sag: Sag is how much the suspension compresses under the rider’s weight, usually measured as a percentage of total travel. A common starting point is ~25% sag (¼ of the shock/fork travel)[23]. To set sag, have the student put on all their gear (backpack, etc.), then sit gently on the bike in a neutral position. Use the O-ring (or a zip-tie) on the shock/fork stanchion: slide it to the seal, have the rider carefully dismount, and measure the distance the O-ring moved. Adjust air pressure (or spring preload) until sag is in the 20-30% range (e.g. a 150 mm travel fork should sink ~30-40 mm with the rider on). Pro tip: Slightly less sag (~20%) gives a firmer ride (good for heavier riders or aggressive terrain), while more sag (~30%) feels plusher (good for technical, rooty trails where traction is key).
Rebound Damping: Rebound controls how fast the suspension springs back after a bump. Too fast and the bike will “pogo” you; too slow and it packs down on successive hits. A quick method to set rebound is the curb test[24][25]: start with the rebound fully open (fastest), then ride off a curb or small drop in a neutral position. If the suspension bounces back so fast it oscillates (bobbing up and down twice), add more rebound damping (turn the knob a few clicks slower). You want it to return in one smooth motion without overshooting[26]. Dial it until a drop yields one compression and return, no extra bounce. Another check: push down on the bike and release - it should rise once and settle. Adjust front and rear similarly and also balance them (front and rear rebound should be in harmony so the bike doesn’t kick or squat unevenly[27]).
Compression Damping: Many forks/shocks have compression adjust (sometimes labeled “Threshold” or a 3-position switch like Open/Trail/Firm). For starters, set it in the middle or fully open for most trail riding. If the rider bottoms out too easily on jumps/drops, you can add a bit more compression or use a firmer setting. If the terrain is really chattery (e.g. braking bumps in Whistler bike park), run it more open for comfort and traction. Compression is a matter of feel - encourage the student to give feedback after a run and don’t be afraid to experiment one click at a time.
Consider Rider and Trail: A lighter or timid rider might benefit from softer suspension (lower pressure, more sag) for sensitivity, whereas a heavier or aggressive rider needs more support (higher pressure, maybe volume spacers, less sag). For example, on Whistler’s rough downhill trails, many riders run slightly faster rebound and maybe a touch more compression to handle repetitive hits; on flow trails with jumps, they might slow the rebound a tad to stabilise takeoffs[28][29]. Always reset to the student’s comfort - the goal is to absorb bumps and keep wheels tracking the ground without overly bottoming out or bucking.
Above all, record the settings (air pressure, rebound clicks, etc.) once dialled. Suspension setup can seem like a science, but with a basic sag setup and sensible rebound, your student will immediately notice a smoother, more controlled ride. And as they progress, you can fine-tune further (or seek a professional suspension tuning guide). Remember, per GSMBC coaching guidelines, even Level 1 coaches are expected to know how to set sag and rebound[30] - it’s part of ensuring students’ bikes are trail-ready and safe.
Q: What are the different types of mountain bikes I should know as a coach?
A: Mountain bikes come in various flavors, each designed for certain terrain and riding style. Here’s a quick guide to the main types you’ll encounter and might help your students choose:
Hardtail Mountain Bike: A bike with a front suspension fork and no rear suspension (the rear is rigid). Hardtails are generally lighter, simpler, and more affordable - great for learning skills, cross-country (XC) riding, or any situation where efficiency is key. Coaches often start youth on hardtails to encourage good technique (since the bike is less forgiving). Example: A hardtail on the smooth XC trails around Squamish, BC is fast and fun.
Full-Suspension Mountain Bike: A bike with both front fork and rear shock. The rear suspension absorbs bigger bumps, making technical trails easier on the rider. There are many sub-types of full-suspension:
Trail Bike: The all-rounder - typically ~120-150 mm of suspension travel. Trail bikes are popular for most of BC’s terrain (from Chilcotins alpine rides to North Shore roots) because they balance climbing efficiency with descent capability.
Enduro Bike: A beefier full-suspension designed for aggressive downhill-focused riding while still being pedal-able. ~150-180 mm travel, slack geometry - built for steep, rough trails and enduro races (think Top of the World trail in Whistler). An enduro bike is basically a mini-downhill bike that you can ride back up.
Downhill (DH) Bike: A specialised big bike (180-200+ mm travel) for lift-served or shuttle downhill runs. Not practical for pedalling up - coaches will see these mostly in bike parks (e.g. Whistler Bike Park coaches might have students on DH bikes for jump lines).
Cross-Country (XC) Bike: A lighter full-suspension (or sometimes hardtail) with ~100 mm travel, steep geometry for efficient pedalling. Designed for endurance and speed over smoother trails. (Many XC bikes are hardtails, but some are full-suspension - the key is they prioritise climbing speed over downhill plushness.)
Hybrid Mountain Bike: A hybrid is a cross between a mountain bike and a road/city bike. It might look like a mountain bike with front suspension but generally is meant for light trails or pathways. Hybrids are not true MTBs for technical terrain - they have more upright positioning, often smoother tires, and are aimed at casual riders or commuters who want to hit the occasional easy trail. Coaches might see hybrids when teaching absolute beginners or kids on gentle trails - they’re fine on gravel paths but not suited for rough singletrack.
Other Types: There are also Fat Bikes (with very wide tires for snow/sand), Dirt Jump Bikes (small hardtails for jump parks), Electric Mountain Bikes (e-MTBs) with pedal assist, etc. But the core ones for coaching students are the hardtail vs full-suspension spectrum.
When advising a student or their parents on bike type: consider the terrain and the student’s goals. For learning fundamental skills, a trail hardtail can be great. As skills advance and if tackling bigger trails (like technical rock rolls or high-speed descents in Coastal BC), moving to a trail or enduro full-suspension can provide more safety and confidence. Understanding bike types helps you as a coach set expectations - e.g., you won’t take a hybrid on a black diamond trail, and you know a long-travel enduro bike might be overkill on an easy green trail for a beginner.
(Alt text suggestion: Illustration of different MTB types - a hardtail vs a full-suspension bike - to show the difference in frame and suspension.)
Q: When and how should a student upgrade their mountain bike or gear?
A: As students progress, their equipment might need to progress too. Here are common upgrade questions and answers:
“When should I upgrade the bike itself?” - Fit and capability are big factors. If a growing child has outgrown their bike (knees hitting bars, too stretched out, etc.), it’s time for a larger frame. Also, if a student is pushing the limits of their bike (e.g. doing jumps on a basic hardtail with entry-level forks), upgrading to a more robust bike can improve safety and performance. A telltale sign is when the bike is holding the rider back: for example, a student ready for Whistler’s advanced trails will benefit from a full-suspension rather than a worn-out old hardtail.
“What components give the biggest performance boost?” - Tires are the #1 upgrade in many cases. Choosing the right mountain bike tires for your local trails can drastically improve grip and ride quality. For BC’s wet roots and loam, a tire with big, soft knobs (e.g. Maxxis Minion or Schwalbe Magic Mary) is popular - it bites into mud[31]. In drier conditions, a faster-rolling tire with closer tread might be better[31][32]. Also consider going tubeless if not already - tubeless tires let you run lower pressure for more traction and they automatically seal small punctures[33]. Other high-impact upgrades: adding a dropper post (if the bike lacks one) so the student can easily adjust seat height, upgrading brakes (e.g. mechanical to hydraulic discs for stronger, modulated stopping), or a better suspension fork if the current one is very basic.
“When should I replace wear items (tires, chain, brake pads)?” - Tires should be changed when the tread is significantly worn down or cracked. In a rainy climate, even if tread is okay, old tires can harden and lose grip - so fresh rubber every couple of seasons is wise if riding often. Brake pads should be replaced when thin (most have indicator lines or you replace at ~1 mm remaining pad). Chains and drivetrain parts wear with miles; a stretched chain can be checked with a simple tool - replacing the chain before it’s too worn can prolong the life of cogs. As a coach doing pre-ride checks, keep an eye on these to advise students (per GSMBC mechanical skill guidelines, checking brakes, chain, etc. is part of being a prepared coach[2][34]).
“What about buying a used bike - what to check?” - Many students start on second-hand bikes. Always do a thorough check on a used bike: examine the frame for cracks or dents, check suspension for smooth operation and no oil leaks, ensure wheels are true and hubs smooth, inspect drivetrain (does it shift cleanly? any rusty or stretched chain?), and test the brakes for firm stopping power. Look for any “play” in bearings (headset, bottom bracket, wheel hubs) - loose components can be fixed, but it’s good to know if the bike needs a tune-up. If anything major is worn out (like suspension needing a rebuild or fried brakes), factor that into the upgrade cost.
Bottom line: encourage students (and parents) to view upgrades as investing in safety and enjoyment. A well-maintained bike with appropriate upgrades will not only perform better but also reduce the likelihood of mechanical issues on the trail. Sometimes the best “upgrade” is actually a proper professional tune-up - a cleaned drivetrain and bled brakes can make an old bike feel new. And always ensure any upgrade adheres to manufacturers’ specs (for example, don’t put an extra-long fork on a frame not meant for it). As coaches, we guide students to make smart choices: upgrade when it removes a limitation or addresses a safety concern, not just for bling. Often, skills improve more with practice than fancy parts - but having reliable gear is fundamental for progress.
In this Q&A we covered the essentials of mountain bike setup for coaches: measuring frame sizes, choosing the right bike for a rider’s height, wheel size pros/cons, dialing in fit (from saddle to handlebars and brakes), basic suspension tuning, and knowing bike types and upgrade timing. Proper bike setup is a cornerstone of GSMBC’s science-backed coaching approach - it builds student confidence and allows their skills to shine. As a coach in British Columbia (or anywhere in Canada), applying these tips on your local trails - whether it’s a beginner loop or the Whistler Bike Park - will help your students ride safer and have more fun.
Want more science-backed coaching tools? Explore GSMBC Certifications or GSMBC Memberships for in-depth training, resources, and community support to level up your coaching game.
References
[1] [2] [22] [30] [34] 2025 GSMBC Ref Guide.pdf
file://file-NfssMbeRu6cYWJtYbq6hc9
[3] [8] What is The Correct Mountain Bike Size For Me?
https://coachlevi.com/mountain-biking/correct-mountain-bike-frame-size/
[4] [5] [13] [14] Mountain Bike Sizing & Fit Guide | REI Expert Advice
https://www.rei.com/learn/expert-advice/mountain-bike-fit.html
[6] [7] [9] [10] [11] [12] [15] [16] Mountain Bike Size Chart & Fit Guide - Ridley's Cycle | Calgary & Okotoks Bike Shops
[17] [18] [19] [20] [21] How to Perfect Your Mountain Bike Brake Lever Setup - Singletracks Mountain Bike News
https://www.singletracks.com/mtb-gear/how-to-perfect-your-mountain-bike-brake-lever-setup/
[23] [24] [25] [26] [27] [28] [29] How to Set Mountain Bike Sag & Set Up Suspension | evo
https://www.evo.com/guides/mountain-bike-bike-suspension-sag-setup-guide
[31] [32] [33] Choosing Mountain Bike Tires: Types & Sizes | REI Expert Advice
https://www.rei.com/learn/expert-advice/mountain-bike-tires.html